
Marnie and Darrell have dinner at Sam and Jessica’s and learn that their upcoming babysitting gig isn’t what they’d been led to believe.

Chapter Seven | Friendship Album: Forget-Me-Not
In this episode, Bess meets Joe’s daughter, and Edwina saves the day.
Share this:


Quilt-Along : The Wedding Ring Block
It’s time for our first block – the Wedding Ring block! (Miss our earlier posts? You can find more information about fabric requirements, cutting tips, and fabric color options.)
Many years ago, Florence and Arthur were engaged to be married but Arthur left town and never showed up at the church. When Arthur returned to Milton Falls years later, Florence and Arthur renewed their friendship and she rented space in one of his buildings for the Milton Falls Quilt Company. Over time, their romance rekindled. Friendship Album: Forget-Me-Not begins with everyone preparing to attend Florence and Arthur’s wedding. Will Arthur place the ring on Florence’s finger? (Listen to chapter 2 to find out.)
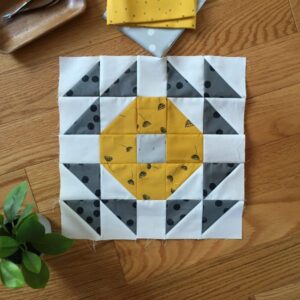 It was such fun to get a sneak read of Friendship Album: Forget-Me-Not when I was designing the Loves Me, Loves Me Not quilt. The novel opens with Dorothy, Eula, Bess and their families preparing to attend Florence’s wedding and speculating with each other whether Florence and Arthur will actually get married this time. Given the importance of the wedding as the novel opens, the Wedding Ring block was a natural choice.
The Wedding Ring block is constructed with half-square triangles (HST). You will need four blocks for the throw-sized quilt and one block for the baby-sized quilt.
The pattern calls for sewing with a scant quarter-inch seam. What does this mean and why is it important? Let discuss!
Consistent seam allowances are important for quilting – blocks to go together nicely and the final quilt top will lay nice and flat. If you sew a perfect quarter-inch seam – i.e. the distance between the stitching line and the edge of the piece is exactly a quarter-inch – you will loose just a thread’s width or two when you press the seam to the side. That might not sound like much but for a block like our Wedding Ring block, those little bits can add up and the final block may be as much as a quarter-inch too small when the half-square triangles are sewn together.
The solution is to sew a scant quarter-inch seam – a seam that is a thread width or two narrower than a quarter-inch. The technique is also helpful for units that need to be trimmed to size because it gives a bit of wiggle room for trimming.
Want to see this in action? Grab two squares of scrap fabric, each 1½” wide. Sew them together using what you think is a perfect quarter-inch seam. Press to one side and then measure the width of your sewn squares. Quilt math says they should be 2½” wide but your ruler will show something slightly smaller. Grab two more squares but this time sew a scant quarter-inch seam and compare the results.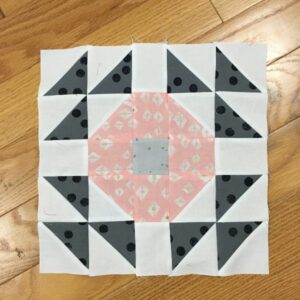
Practice your scant quarter-inch seams and then tackle your Wedding Ring blocks!
Before you head off to the sewing machine, I promised a sneak peak at our next giveaway! To be eligible, you will need to share a photo of two blocks – two Wedding Ring blocks, two Ohio Stars (next week’s block), or one of each – by February 27. (More information on how to share will be available soon.) The giveaway sponsors are Oliso and Fat Quarter Shop. Until then, please share your blocks on Instagram and in the Quilt Fiction Facebook group – use tags #lovesmelovesmenotqal, #quiltfictionqal, and #storyguildqal.
Next Monday, February 13, we will make block 2 – the Ohio Star. It is a classic block you’ve likely made before. I will share a tip for trimming the hour-glass unit – the trickiest part of the process.
Don’t yet have the pattern? You can buy the pattern at the Quilt Fiction Shop.
If you have any questions, feel free to leave a comment or email qal@quiltfiction.com.
Share this:


Chapter Six | Friendship Album: Forget-Me-Not
In Episode Six, a new student joins Eula’s quilting class and the idea for a quilting bee at Building No. 5 is born.
Share this:


Quilt-Along: Cutting Fabrics
It has been great fun to hear about everyone’s fabric choices and now it is time to put in a new rotary blade and start cutting!
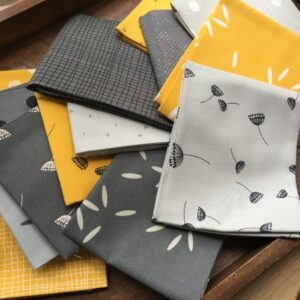
For the throw-sized quilt, I used a beautiful fat quarter bundle supplied by Moda Fabrics of Zen Chic’s Filigree plus yardage of white (Moda 9900-200) for the background. I love the shades of gray with the golden yellow color. The design on the fabrics were very fun too – the dandelion like flower is my favorite!
Pages 3 and 4 from the Loves Me, Loves Me Not pattern contain all the cutting instructions you need for the throw-sized quilt (page 3) and the baby-sized (page 4). The background fabric section includes the instructions for all the background units required for the blocks plus the units required for sashing and the outer borders. Likewise, for the 3 primary fabrics – dark gray, light gray, and gold – the instructions contain all the units you will need for all the blocks in the pattern.
If you are cutting from yardage, you can work directly from those pages depending on the size quilt you are making.
As the pattern designer, I truly enjoy seeing how a quilter brings their own personality and stash to a quilt so here are some tips if you aren’t working with yardage!
Using scraps? The individual block instructions (pages 5-13) each contain the units you will need to cut in order to make a single block along with how many blocks of that type you need to make for each of the quilt sizes. Use the instructions on pages 3 or 4 to cut your background units then use each of the individual block instruction pages to cut from your scraps.
Using fat quarters? The individual block instructions (pages 5-13) each contain the units you will need to cut in order to make a single block along with how many blocks of that type you need to make for each of the quilt sizes. Use the instructions on pages 3 or 4 to cut your background units. For primary fabric, cut strips from a fat quarter that matches the dimension of a specific unit in the first block and sub-cut that strip for the units you will need. (For best results, orient your fat quarter so the cut strips are 18″ long.) My quilt used four unique dark gray fat quarters, two unique light gray and three unique gold.
Unsure which size quilt you are making? Start with the cutting instructions for the baby-sized but do not cut the strips for sashing and for outer borders. Perhaps use a highlighter to mark those instructions to make it easier to find them when you come back to later.
Want to use one background fabric for sashing and borders and another for blocks? The cutting instructions clearly mark the units required for sashing and border so consider using a two different highlighters to help you remember which to cut in which background fabric. For throw-sized quilt, you will need 1 1/2 yards for sashing and border. For the baby-sized quilt, you will need 3/4 yard.
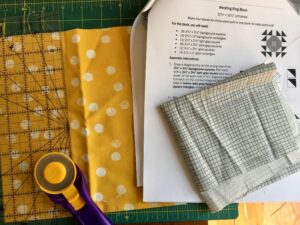
Yardage, fat quarters or scraps – leave a comment and let me know what you are sewing with!
Next Monday, February 6, we work on our first block – the Wedding Ring – and I will share a tip about the scant quarter inch plus tell you all about our next sponsor giveaway!
Don’t yet have the pattern? You can buy the pattern at the Quilt Fiction Shop.
If you have any questions, feel free to leave a comment or email qal@quiltfiction.com.

